Chapter 4 - Remote CockroachBot Monitoring

Continuing our discussion on WebSocket, internet & WIFI...

In this chapter, we will proceed in enhancing the Client UI frontend.
First, let me introduce P5.js, a javascript library original meant for Artsy folks. It is well-known among creative technology art creators as an easy-to-use library that enables software (& non) developers to quickly create software to make images, animations, and interactions.

The Processing project (Father of the p5.js) is deemed a success. Since its introduction, a growing community of programmers has preferred to learn software programming & eventually write/code software by focusing on graphics and interaction rather than data structures and text console output.

p5.js official site:  Link


Using cloud base p5.js Editor:

We are going to use the cloud/web editor to create your first p5.js sketch using online with no software installation needed:  Editor

 Go ahead, head on over to the online editor link above & try out the code as shown on the right.

 I highly recommend creating an account for yourself. As this would allow you to store your sketches online using their free cloud storage.


Recreating the previous 80's HTML:

Part of the concept of IR4.0 is for cloud servers working together for a better experience for the end-user. So we are going to slowly shift robot software components to other places.

Starting with the Web interface. In our previous example, our C3 CoreModule is serving up both a WebSocket server & a web server hosting a single page for users to interact with the CockroachBot
We will move the webserver out of the robot, freeing up valuable onboard resources; this move would also allow us to create a much more welcoming web interface.


 The future...

You can use your imagination here; other than the  webserver, which could exist in the cloud. We can even move the WebSocket server onto the cloud as well...(the CockroachBot will connect to the WebSocket server in the cloud as a client, similar to all the other connected clients)   
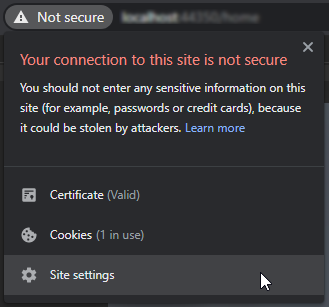


 Allowing insecure WebSocket connections:

Security in web browsers can be a nuisance during development, especially when all the network infrastructure is not yet in place. Unfortunately, modern browsers also don't allow insecure WebSocket connections (ws) from secure websites (https).  

Luckily there is a way around this huddle. In Chrome browser, navigate over to the site & click the padlock button to the left of the address bar. Next, select "Site settings" from the menu. This would allow you to configure security at the site level.


A list of permissions is displayed. Scroll almost to the bottom and look for Insecure content. By default, this permission is set to Block. To allow insecure WebSocket connections, you need to change it to Allow:


 Todo:

  • Change the IP address variable "host" to your C3 CoreModule on the Robot. 
    var host = '192.168.0.XXX:81';

    Local LAN private IP address are assigned by your home router. Valid private IP addresses falls into the following ranges:
    - Class A: 10.0.0.0 — 10.255.255.255  e.g. 10.0.0.5
    - Class B: 172.16.0.0 — 172.31.255.255 e.g. 172.25.1.8
    - Class C: 192.168.0.0 — 192.168.255.255 e.g. 192.168.1.15

    ":81" informs the WebSocket API that we will be using port 81 as the WebSocket server port number.

  • (For your info) There are lots of reference online about p5.js.
    Official p5 Reference:  Reference
    Self guided tutorial:  happycoding

     Trying out the tutorial will help you greatly in creating your "Ultimate Robot"

  • Implement the rest of the Web UI interface needed to control our CockroachBot remotely.

  • (Advance) With p5.js being simply a javascript library. You can host the file in any available Web/Cloud server you may have.

    Try to bring your implementation to a localhost (or a local raspberry pi server). If you are even more adventurous, you can get an AWS, Azure cloud host to host your solution. (If you need to access your robot from a remote location, make sure your ISP & router is set up to do so).

    Reference:  Local host